It’s been several years since I updated this blog. Let’s dust it off a bit.
I updated my Zsh prompt to be more efficient and more useful. Features:
Display current path abbreviated to the 3 last subdirectories:
Automatically detect git repos. Display the name of the repo and the current branch:
Display indicators if the git repo contains untracked/unstaged/staged files:
Here is the code:
setopt prompt_subst
autoload -U colors && colors
# Colors for the Tomorrow Night theme# xterm-256color codes: https://jonasjacek.github.io/colors/color_path='117'# SkyBlue1color_repo='148'# Yellow3color_branch='246'# Gray58color_modified='167'# IndianRedcolor_untracked='221'# LightGoldenrod2color_staged='148'# Yellow3color_host='93'# Purple# Return a colored string containing the name of the git branch in parentheses, like (master).
git_branch(){local BRANCH=$(git rev-parse --abbrev-ref HEAD 2> /dev/null | sed-e's/\(.*\)/on \1/g')echo" %F{$color_branch}$BRANCH%f"}# Return a colored string containing bullets of different colors indicating# staged/untracked/modified files in a git repo.
git_status(){# Populate flags with bullets of different colors for staged/untracked/modified fileslocal MODIFIED="%F{$color_modified}●%f"local UNTRACKED="%F{$color_untracked}●%f"local STAGED="%F{$color_staged}●%f"local-a FLAGS
if! git diff --cached--quiet 2> /dev/null;then
FLAGS+=("$STAGED")fi
if[[-n$(git ls-files --other--exclude-standard`git rev-parse --show-toplevel` 2> /dev/null)]];then
FLAGS+=("$UNTRACKED")fi
if! git diff --quiet 2> /dev/null;then
FLAGS+=("$MODIFIED")fi# Format flags to add a space if not emptylocal-a STATUS
STATUS+=("")[[${#FLAGS[@]}-ne 0 ]]&& STATUS+=("${(j::)FLAGS}")echo"${(j::)STATUS}"}# If in a git repo, return git_branch() and git_status().# Otherwise return nothing.
prompt_git_info(){# Exit if not inside a Git repository! git rev-parse --is-inside-work-tree> /dev/null 2>&1 &&return
echo"$(git_branch)$(git_status)"}# Return a colored string containing the path, shortened to the last 3 directories.# The current directory is highlighted.# If in a git repo, the string starts at the root of the repo, highlighted in different color.
prompt_path(){local PROMPT_PATH=""local CURRENT=$(basename$PWD)if[[$CURRENT= / ]];then# At /PROMPT_PATH="%F{$color_path}/%f"elif[[$PWD=$HOME]];then# At ~PROMPT_PATH="%F{$color_path}~%f"else
local GIT_REPO_PATH=$(git rev-parse --show-toplevel 2>/dev/null)if[[-d$GIT_REPO_PATH]];then# Inside a git repo.ROOT=$(basename$GIT_REPO_PATH)# repo nameif[[$PWD-ef$GIT_REPO_PATH]];then# At the root of the repo.PROMPT_PATH="%B%F{$color_repo}$ROOT%f%b"else# Below the root of the repo.REAL_PWD=$PWD:A
PATH_TO_CURRENT="${REAL_PWD#$GIT_REPO_PATH}"# path from root, without rootPATH_TO_CURRENT="${PATH_TO_CURRENT%/*}"# remove last dirif[[-z"$PATH_TO_CURRENT"]];then# Just one level below rootPROMPT_PATH="%F{$color_repo}$ROOT/%f%B%F{$color_path}$CURRENT%f%b"else# More than one level below rootlocal-aDIRS=(${(s|/|)PATH_TO_CURRENT})# split string into array using /local LENGTH="${#DIRS[@]}"if[[$LENGTH-gt 2 ]];then
PATH_TO_CURRENT="/…/$DIRS[$LENGTH-1]/$DIRS[$LENGTH]"fi
PROMPT_PATH="%F{$color_repo}$ROOT%f%F{$color_path}$PATH_TO_CURRENT/%B$CURRENT%b%f"fi
fi
else# Not in a git repo.# Note: this expression checks for 4 elements long: %(4~|true|false)PATH_TO_CURRENT=$(print -P"%(4~|…/%3~|%~)")# shortened pwdPATH_TO_CURRENT="${PATH_TO_CURRENT%/*}"# remove last dirPROMPT_PATH="%F{$color_path}$PATH_TO_CURRENT/%B$CURRENT%b%f"fi
fi
echo"$PROMPT_PATH"}# Return a colored string containing the local host name, if ssh.# Return an empty string otherwise.
remote_hostname(){local MACHINE=""if[-n"$SSH_CLIENT"];then
MACHINE="%F{$color_host}[%m]%f "fi
echo"$MACHINE"}export PROMPT=$'$(remote_hostname)$(prompt_path)$(prompt_git_info) %F{$color_path}❯ %f'# Simple/uncolored prompt for troubleshooting
noprompt(){export PROMPT='%2~ ❯ '}
Or course, if you are just starting with zsh you are better off just adopting
Oh My Zsh and Powerlevel10k.
I switched from bash to zsh a few years ago and I am never looking back! It
has awesome tab completion: for example cd doc/sh/pl becomes cd
Documents/shared/planning. It also expands git commands and branches,
environment variables and other things. It has extended file globbing which
provides a good replacement for find. If you spend a lot of time in the
shell, you should really give zsh a try.
Whatever shell you use, it’s worth spending a few minutes configuring your
prompt. The prompt is something you will see literally thousands of times a
day. So why not make it useful?
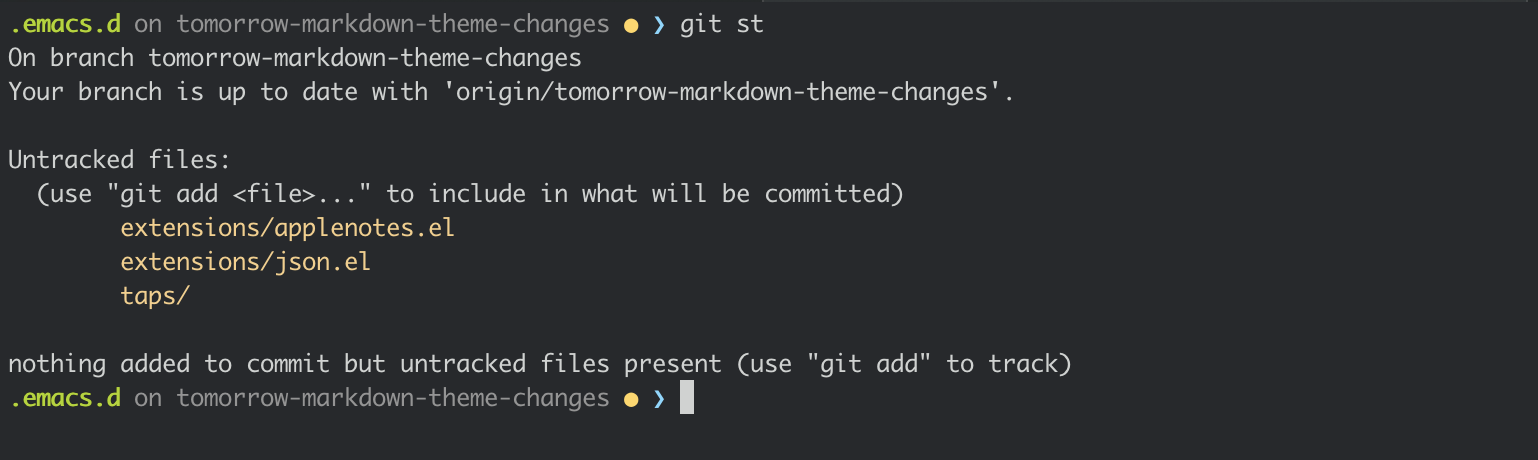
Here is mine. First, let’s open a new shell in the home directory:
Simple and to the point. ~ sweet ~! Let’s go into some directory:
It displays the path, from the home directory, with the current directory
displayed in bold (“planning”). To keep the prompt short, we only display the
last 3 subdirectories:
And now let’s move into a git repo:
The prompt displays the path starting at the root of the repo (“org”), and also
the current branch in green (“master”). Now let’s move into a subdirectory in
the same repo:
The root of the repo is highlighted (“org”), and the current directory is
displayed in bold like before. We could also display something indicating if
the repo is clean or if it has uncommitted changes, but I prefer to keep it
simple.
The colors are from the
Tomorrow Night theme, which
also happens to be the default theme in
Exordium.
Here is the code (in ~/.zshrc):
# Zsh options
setoptprompt_substautoload-Ucolors&&colors# Colors
BLACK=$'\033[0m'GREEN=$'\033[38;5;148m'BLUE=$'\033[38;5;117m'DARK_BLUE='\033[38;5;4m'current_git_branch(){gitrev-parse--abbrev-refHEAD2>/dev/null|sed-e's/\(.*\)/(\1)/g'}current_directory(){PROMPT_PATH=""CURRENT=`dirname ${PWD}`if[[$CURRENT=/]];thenPROMPT_PATH=""elif[[$PWD=$HOME]];thenPROMPT_PATH=""elseGIT_REPO_PATH=$(gitrev-parse--show-toplevel2>/dev/null)if[[-d$GIT_REPO_PATH]];then# We are in a git repo. Display the root in color, then the path
# starting from the root.
if[[$PWD-ef$GIT_REPO_PATH]];then# We are at the root of the git repo.
PROMPT_PATH=""else# We are not at the root of the git repo.
BASE=$(basename$GIT_REPO_PATH)GIT_ROOT="%{$fg_bold[red]%}%{$DARK_BLUE%}${BASE}%{$reset_color%}"REAL_PWD=$PWD:APATH_TO_CURRENT="${REAL_PWD#$GIT_REPO_PATH}"PATH_TO_CURRENT="%{$BLUE%}${PATH_TO_CURRENT%/*}%{$reset_color%}"PROMPT_PATH="${GIT_ROOT}${PATH_TO_CURRENT}/"fielse# We are not in a git repo.
PATH_TO_CURRENT=$(print-P%3~)PATH_TO_CURRENT="%{$BLUE%}${PATH_TO_CURRENT%/*}%{$reset_color%}"PROMPT_PATH="${PATH_TO_CURRENT}/"fifiecho"${PROMPT_PATH}%{$reset_color%}%{$fg_bold[red]%}%{$BLUE%}%1~%{$reset_color%}"}exportPROMPT=$'$(current_directory) %{$GREEN%}$(current_git_branch)%{$BLACK%}%# '
Notice the function current_git_branch: this is the fastest way I have found
to get the name of the branch. The trick is to make the execution of the prompt
as fast as possible, since it gets executed every time you hit Enter.
This is the second article in a series about Emacs Org mode. It assumes that you read
the first one.
Today we’ll talk a bit about
literate programming. The
idea is to write an Org mode document that includes snippets of code, and
possibly the result of their execution as well. It kind of reverses the way you
think about documenting code: instead of adding comments inside your program,
you add your program’s code inside the documentation file. In the end the
result is the same, you still get executable code.
Org mode includes a feature named
Babel which allows for
embedding code in any programming language you fancy. Let’s get started.
Enabling Babel
First, we need to make sure that Babel is enabled for a few other languages
than ELisp (the only one by default). Add the following in your emacs
configuration and evaluate it with M-C-x (or restart Emacs):
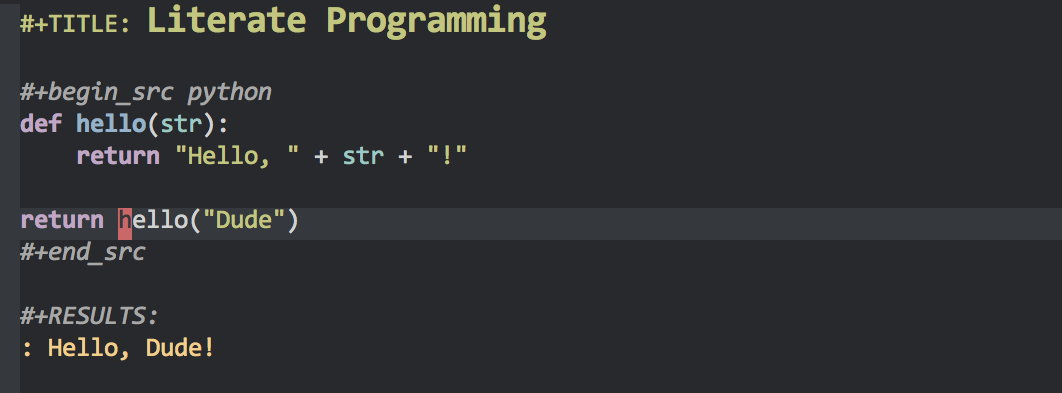
The #+TITLE directive is just to add a title to the Org file; it is not
really needed. The other directives we use are #+begin_src and #+end_src
which respectively introduce and close a code block for a particular
language. Note that Emacs automatically applies the proper syntax highlighting.
Type C-c C-c to evaluate the code block under the point. After confirmation,
Babel will insert a new block #+RESULTS with the result of the evaluation,
like so:
What happened here? Emacs forked a process to execute the code using Python,
and got back the returned value, and inserted it into the buffer.
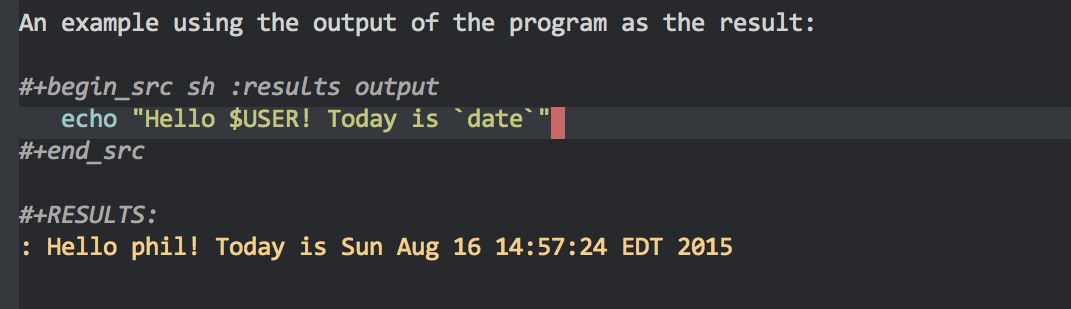
By default the result is the returned value i.e. the last expression that was
executed, but you can also use the output of the program as the result with a
directive like: #+begin_src python :result output. For example, evaluate the
shell statement below, again using C-c C-c:
#+begin_src sh :results outputecho"Hello $USER! Today is `date`"#+end_src
Calling code blocks
Babel also allows you to refer to code blocks from elsewhere in your document,
by labeling each block with a name, using directive #+name. Let’s say we have
some Ruby code to revert a string (yes, I know we could use the native
reverse!):
We can now call this block. Note that we get the result of the block
evaluation. So if you want to use the result of a function in the block, you
also need to add the call to that function (see the last line).
To call the block, add a #+call directive referring to the block’s name and
binding the input variable str, and type C-c C-c with the point onto it:
#+call: reverse_str(str="The Quick Brown Fox")
More fun
Here is a more practical example to illustrate the power of Babel, using
different languages to get the job done. This is actually similar to an iPython
notebook.
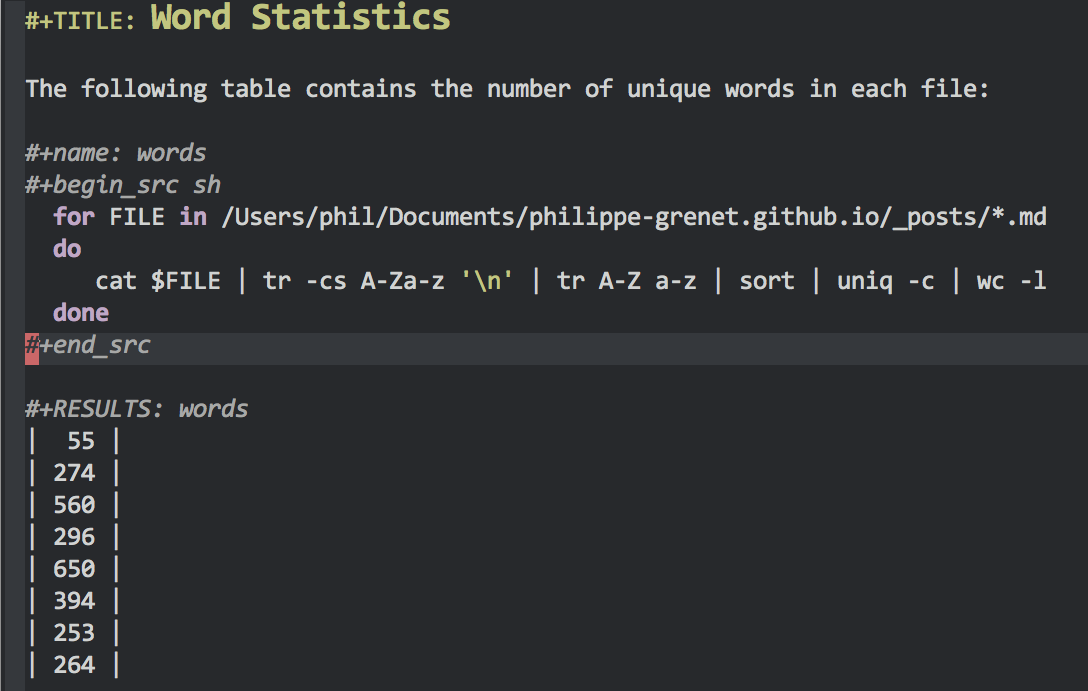
Suppose I want to produce a report containing statistics about the words that
are used in a collection of files. Assuming all these files are in the same
directory (let’s say they are Markdown files), this shell script counts the
number of unique words in each file:
#+name: words#+begin_src shfor F in /Users/phil/Documents/philippe-grenet.github.io/_posts/*.md
do
cat$F | tr-cs A-Za-z '\n' | tr A-Z a-z | sort | uniq-c | wc-ldone#+end_src
The result has multiple lines, one per file. Therefore it is stored into an Org
table:
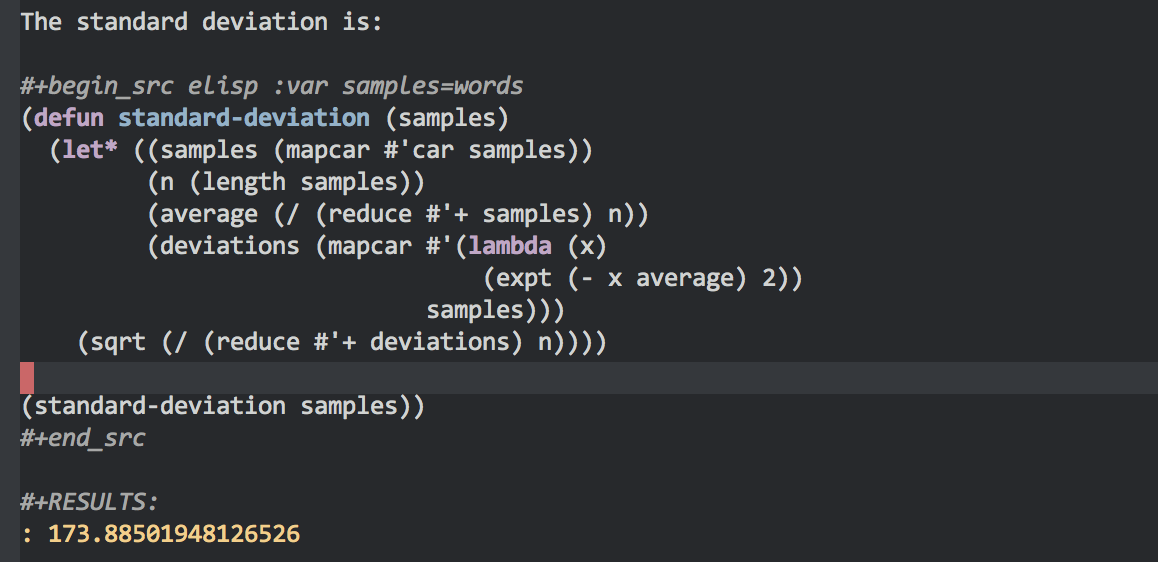
Now let’s compute the standard deviation. We could follow up with another shell
script, but it is easier to do this in ELisp. Add this block in the buffer:
The #+begin_src directive uses the :var keyword to bind the Lisp variable
samples to the output of the words code block (which is the table
above). In Lisp that samples variable will be set with a list of
lists. Basically each row in the table is a sublist, and since the table has
only one column the sublists only contain a single number, like this:
;; Value of 'sample':'((55)(274)(560)(296)(650)(394)(253)(264))
If you evaluate the block with C-c C-c, you get the final result:
You can of course re-run the report anytime you want. Once we have our report
ready, Org mode is able to export it into plenty of different formats, choosing
exactly what should be included and excluded. But that’s a discussion for
another day.
If you are a programmer, there probably isn’t a day that goes by when you don’t
need a calculator, for example for things like base conversion. After all, like
Dijkstra said, programming is math.
Emacs includes a calculator, which is actually quite sophisticated. It is
capable of both algebraic and symbolic calculations; it has a ton of functions
and it can handle matrices or solve equations, if you need that sort of
things. It can even create graphs if you have GnuPlot installed on your
machine.
Here we will just review the basics. Check out the
manual for more. There
a nice Info manual embedded in Emacs which you can bring up using C-h i g
(calc).
Start the calculator using M-x calc. It will show up at the bottom of the
screen. Type q to quit. Once the calculator is started, you can hide and
redisplay it using C-x * *.
RPN logic
Calc uses the RPN
(Reverse Polish Notation) logic. Which is only fair, since Lisp uses the Polish
notation! Anyway, if you are a fan of the HP calculators, you will be just at
home.
Calc displays a stack of numbers. When you type a number, it accumulates in the
stack. When you type an operator such as + or *, it operates on the last 2
numbers of the stack, and replaces those numbers with the result.
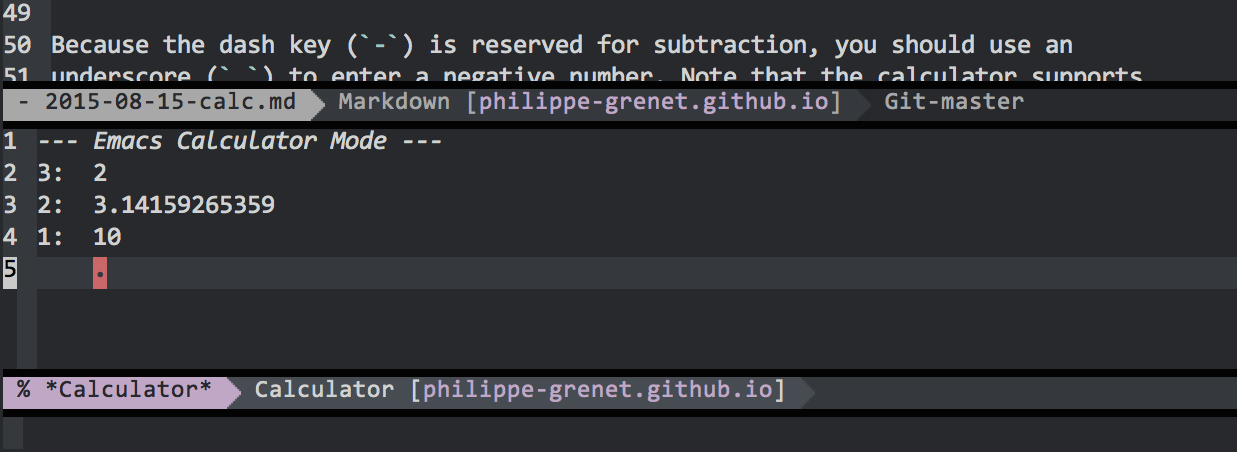
Give it a try: Type M-x calc, then the following:
2 Enter
P (no need to press Enter)
10 Enter
The P inserts π. Now you have 3 numbers in the stack, and you can calculate
the circumference of a circle of radius 10 (C = 2 π r). Press * once, the
stack now shows 2 and 31.4159265359. Press * another time and you get a
single number which is the result.
Because the dash key (-) is reserved for subtraction, you should use an
underscore (_) to enter a negative number. Note that the calculator supports
arbitrarily big numbers. If you want to challenge it, try calculating 2^200
(that’s 2 Enter, 200 Enter, then ^). The default precision is 12 but you
can change it using p.
Type n to negate the last number, and TAB to flip the last 2 numbers. The
delete key deletes the last number on the stack.
If you need to use complex numbers, enter them like (a,b). If you need
fractions, enter them like 1:3 (1/3). You can also enter an algebraic
expression directly by typing ' (the quote key) then your expression, such as
2 + (10 / 5). The result will be put on top of the stack.
Most functions use a single key. For example, type s for Sin, c for
Cos, t for Tan, etc. The more complex commands are modal: they start with a
prefix key, which leads to a prompt for the subcommand key. If you get lost,
type ? and the mini-buffer will show you what is available.
If you make a mistake, type U to undo and D to redo. Of course this is
Emacs, you have an infinite number of undos and redos. You can also reset the
calculator using C-x * 0.
Base conversion
You can enter any number in the format base#number. Example: 16#FF is
immediately converted to 255.
For the reverse, you need to set the output display mode. In this example, d r
16 followed by Enter sets the display to base 16. d r 2 sets it to
binary. Set it to base 10 to get the default behaviour again.
In this short post we’ll review a few features of Emacs that are not well
known, but really worth knowing.
Repeating commands
The simplest way to repeat a command is to type Control-a number, then the
command. For example if I type C-6 C-0 ~ (that’s 6 then 0 with the Control
key down, then the tilde character), I get a line with 60 tilde:
Another way is to use the universal argument: we saw how to write an
interactive Lisp function that accepts a numeric argument in the
previous article. forward-line is such a function;
it goes down N lines (by default one line). For example C-u 1 0 DOWN
(Control-u then 1 then 0 then the down arrow key) goes down 10 lines. You can
do the same by calling the function explicitly with C-u 1 0 M-x forward-line.
Registers
Registers are used for saving temporary data in the current session. They can
store positions or bookmarks, text, numbers etc. Registers have a name which is
a letter or a number: a to z, A to Z (so case-sensitive) and 1
to 9, which gives you a total of 62 registers. That’s more than enough.
C-x r is the prefix for all register operations. Generally you type this
prefix, then a key to specify what operation you want (e.g. save or read), then
the register name which is one extra key.
Buffer positions
For example, open any file you have in one of your projects, go to some
position in the file, and hit C-x r SPC a (where SPC is the space
bar). This command stores the buffer position in register a. Now go to a
different buffer such as the scratch buffer, and type C-x r j a: this command
will jump back to the buffer and the position you just stored in register a.
Note that if you close the file and then retype the same command, Emacs will
ask you if you want to reopen the file, and it will bring you back to the same
position again. This can be useful if you want to keep bookmarks in a large
project, for example if you keep going to the same files and bits within these
files, but you don’t want to keep them open all the time.
You can view the content of register a with command M-x view-register then
a at the prompt. It will show a window saying that this register stores a
position in your buffer (note that the position is a number, which represents
the offset from the beginning of the buffer). Type C-x 1, or q in the other
window, to dismiss it.
Bookmarks
A bookmark is similar to a buffer position but with a twist: you give it a name
and it is persisted between Emacs sessions. Note that bookmarks are not
actually associated with registers, but they use the same C-x r prefix.
The command is C-x r m (mark) which prompts for a name. By default it
proposes the current buffer name but you can choose whatever you want. You can
view the list of bookmarks with C-x r l (list). Just click on a bookmark to
jump to it. You can also jump to a bookmark with C-x r b (bookmark) which
prompts for the name using auto-complete. The nice thing about bookmarks is
that they are saved on the filesystem when you exit Emacs, and they are
available when you restart it. You can also force save with M-x
bookmark-save.
Text
Sometimes you want to save a snippet of text somewhere, so you can paste it
later. One way is to use the kill ring: M-w to save the selected text
(which is what Emacs calls the region), then C-y to paste. The kill ring
saves all copy operations you have done so far, so if you want to paste the
second previous thing you copied, type C-y followed by M-y (repeat M-y to
go back in history).
Another way is to save the region in a register, which you do with something
like C-x r s a (save in register a). Now if you want to insert the content
of a register at the current point, type C-x r i a (insert the content of
a).
Windows
This is less useful than the above, but you can also save a window
configuration in a register. For example, split the screen horizontally with
C-x 2, then split the current window vertically with C-x 3. You now have 3
windows displayed, which you can resize as you see fit.
Let’s save this layout in register a with C-r w a. Now dismiss all other
windows than the current one using C-x 1. If you want to restore the layout,
type C-r j a (it is the same key for jumping to a buffer position). Note that
this only saves window configurations and not buffers content: if you close one
of the buffers Emacs will not reopen it for you.
Summary
The table below summarizes the keys we just learned.
Key binding
Description
C-x r SPC a
Store the current position to register a.
C-x r j a
Jump to the position stored in register a, or restore the window positions stored in register a.
C-x r s a
Save the selected region in register a.
C-x r i a
Insert the text saved into register a.
C-x r w a
Save window positions in register a.
C-x r m
Save a bookmark.
C-x r b
Go to a bookmark.
C-x r l
List bookmarks.
Macros
Editing macros are a very powerful feature of Emacs. After all, Emacs stands
for “Editing Macros” 1.
There are several keys for macros, but really you only need to remember two of
them: F3 and F4. The first one records a new macro. The second one
terminates the recording, if you were recording a macro; otherwise it executes
the macro. If you make an mistake while recording a macro, hit C-g to abort,
and start over.
Let’s take an example. Suppose I have this text:
the quick brown fox
jumps over
the lazy dog
Now suppose I want to make each line start with a capital letter and end with a
period. I could edit the text manually because it is only 3 lines, but just
imagine that it is much longer for argument’s sake, in order to make the use of
a macro more compelling.
The way to do this with a macro is simple: fix the first line, while recording
a macro. Then execute the macro N times, one time per remaining line. To record
the macro do the following:
Move the cursor to the beginning (e.g. M-<).
F3 to start recording.
M-c to capitalize the first word (The).
C-e to go to the end of the line.
. to insert a period. Now the first line is good.
C-a to go to the beginning of the line (where we started), and the down
arrow to go to the next line.
Now type F4 to stop recording. Then F4 again to run the macro on the second
line. Then F4 again to run the macro on the 3rd line. You’re done!
The quick brown fox.
Jumps over.
The lazy dog.
You could also run the macro N times using Control-a number then F4, as we
saw earlier. You can also apply the macro to a whole region by selecting the
region and running M-x apply-macro-to-region-lines, which is neat.
If you want to see macros at their best (and incidentally Emacs beat Vim
at its own game), check out this quick video:
The entire series of Emacs Rocks is worth watching.
That’s it for today. Lots more to come. Stay tuned!
Note that Emacs editing macros have nothing to do with Lisp macros: one is a trick to save a sequence of keys and repeat it, the other is a Lisp function that executes twice, at compilation time and at run time. ↩